Search This Blog

Thursday, June 3, 2010

Replication of a theme for using it Parallel

1. I am assuming that plugins environment is ready.


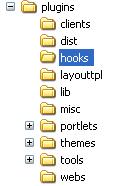
2. If so, you can see the folder structure as in the screen shot.

3. Navigate to themes directory through command prompt.


4. Execute the command create sample "Sample" as seen the figure below.


5. After build successful, you can see the sample-theme folder as show in the below screen shot.


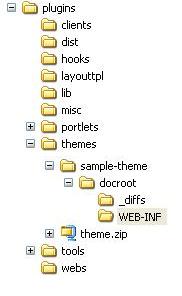
6. Now, copy all the folders(css,images,javascript,templates) from an existing theme which you would like to replicate and place it under sample-theme->docroot--> _diffs

7. copy liferay-look-and-feel.xml from existing theme which will be available under WEB-INF and place it under sample-theme--> docroot --> WEB-INF.

8. Edit liferay-look-and-feel.xml(under sample-theme--> docroot --> WEB-INF) and modify the
<theme id="sample-theme" name="Sample Theme>

9. Navigate to sample-theme directory through command prompt and deploy your theme.
10. After successful deployment, test your replicated theme.


Wednesday, May 26, 2010

How to create a custom query in ext environment for Liferay

Step-1:
------

Create the file default-ext.xml under ext-impl/src/custom-sql (cerate custom-sql folder if it is not there)

<?xml version="1.0"?>

<custom-sql>
<sql file="custom-sql/book.xml" />
</custom-sql>

(You can refer default.xml under portal source)

Step-2:
------

Create the file queries.xml, under the same folder, which will contain all the application specific queries as name / value pairs.

<?xml version="1.0"?>
<custom-sql>
<sql id="ur_id">
<![CDATA[
SELECT {Book.*} FROM Book WHERE (Book.title like ?)
]]>
</sql>
</custom-sql>


Step-3:
------

Add your entry in portal-ext.properties

custom.sql.configs=\
custom-sql/default.xml, \
custom-sql/default-ext.xml

Step-4:
------

Create the file "BookFinderImpl.java" under service/persistence and do the required imports

public class BookFinderImpl extends BasePersistenceImpl implements
BookFinder{

}


Step-5:
------

Do ant build-service, so that the necessary interface is generated.

Step-6:
------

Now write the actual logic to access the custom SQL. You need to update the BookFinderImpl
we developed in the previous step.

// the name of the query
public static String GET_QUERY = "id_given_in_queries.xml";


// the method which will be called from the ServiceImpl class
public List getBooks(String pattern) throws SystemException {

Session session = null;
try {
// open a new hibernate session in normal case when you are opening session for same entity
session = openSession();
// In case of other entity you set the session first like below then open the session
setSessionFactory((SessionFactory)PortalBeanLocatorUtil.getBeanLocator().locate(TagsAssetModelImpl.SESSION_FACTORY));
session = openSession();

// pull out our query from book.xml, created earlier
String sql = CustomSQLUtil.get(GET_QUERY);

// create a SQLQuery object
SQLQuery q = session.createSQLQuery(sql);

//In normal case : In our case book use this
q.addEntity("Book", BookImpl.class);

//In other case : In our case TagsAsset use like this
q.addEntity(TagsAssetModelImpl.TABLE_NAME, TagsAssetImpl.class);


// Get query position instance
QueryPos qPos = QueryPos.getInstance(q);

// fill in the "?" value of the custom query
// this is same like forming a prepared statement
qPos.add(pattern);

// execute the query and return a list from the db
return (List)q.list();

/*
// use this block if you want to return the no. of rows (count)

int rows = 0;

Iterator itr = q.list().iterator();

if (itr.hasNext()) { Long count = itr.next();

if (count != null) { rows = count.intValue(); } }

return rows;
*/
} catch (Exception e) {
throw new SystemException(e);
} finally {
closeSession(session);
}
}

Make the necessary additional imports.

import java.util.List;

import com.ext.portlet.library.model.Book;
import com.ext.portlet.library.model.impl.BookImpl;
import com.liferay.portal.SystemException;
import com.liferay.portal.kernel.dao.orm.QueryPos;
import com.liferay.portal.kernel.dao.orm.SQLQuery;
import com.liferay.portal.kernel.dao.orm.Session;
import com.liferay.util.dao.orm.CustomSQLUtil;

Note:

To get the result between a start and end index, you have to use,

QueryUtil.list(q, getDialect(), begin, end);

in the place of

q.list();

where, you will pass the parameters (begin and end) from your ServiceImpl class.

Step-7:
------

write the method in BookLocalServiceImpl.java

public List searchBook(String title) throws PortalException,
SystemException, RemoteException {

// return bookPersistence.findByTitle(title);
return BookFinderUtil.getBooks("%" + title + "%");
}


Step-8:
------

run "ant build-service" again passing the service.xml file as parameter.

This will update the corresponding interface with the new method defined.


Step 9:
-------

Now go ahead and call BookLocalServiceImpl method from your jsp or java normally how you call other methods

Tuesday, May 25, 2010

Implementing JSP Hooks in Liferay

Implementing Hook is an easy way to modify existing portal source, here we can see how to modify a jsp which resides in portal.

Steps:
I assume that SDk Plugin has been installed and configured properly.

sdk-plugins will be referred as PLUGINS_HOME.

1. Go to hooks folder which is available under PLUGINS_HOME. as show in the image.
2.create a folder under hooks, for example lets create JSPHook.
3. create docroot under JSPHook.
4. create build.xml under JSPHook.
5. place the below content in your build.xml for deploying/building your hook.

<?xml version="1.0"?>
<project name="hooks" basedir="." default="deploy">
<import file="../build-common-hook.xml">
</project>


6. create WEB-INF under docroot.
7. create liferay-hook.xml. place the below content in liferay-hook.xml

<?xml version="1.0" encoding="UTF-8"?>
<!DOCTYPE hook PUBLIC "-//Liferay//DTD Hook 5.1.0//EN" "http://www.liferay.com/dtd/liferay-hook_5_1_0.dtd">

<hook>
<custom-jsp-dir>/WEB-INF/CustomJSPs</custom-jsp-dir>
</hook>


8. create the jsp folder structure of the portlet which you are going to implement the hook.
for example: if you are customizing view of blogs portlet, then the you have to create the folder structure as /WEB-INF/CustomJSPs/html/portlet/blogs/view.jsp.
FULL PAtH from PLUGIN_HOME looks like this PLUGIN_HOME/JSPHook/docroot/WEB-INF/CustomJSPs/html/portlet/blogs/view.jsp
now open the view.jsp and customize it accordingly.

9. Go to plugins/hook and do ant deploy
10. check for the changes which you have made in view.jsp.